

Our 11-year-old Eclipse AVN4430 head unit with TomTom navigation maps is now woefully outdated. I won't miss its small, difficult-to-read screen or any of the other quirks that came with it. Enter the Atoto Android head units, which are rapidly gaining popularity. Their premium, ultra, and ultra plus models boast a QLED display that remains easily readable even in bright sunlight. Opting for the larger 10-inch Atoto S8 Premium model was a no-brainer for me, especially considering its affordability compared to other high-end units with similar specs.
For those who prefer sticking to popular brands and are willing to splurge, the Kenwood DMX1037S or the Alpine Halo11 iLX-F511 are excellent alternatives.
One of the most significant advantages of Android head units like the Atoto is the ability to install Android apps. While not all apps are supported due to running on older Android versions, many still work seamlessly. Moreover, the Atoto unit comes equipped with both wireless and wired Android Auto and CarPlay functionalities. Adding the optional 180º 720P backup camera enables a Virtual-Surround-View (virtual 360º view) when reversing.
The Atoto's large10-inch QLED screen is a game-changer; text, icons, and apps are all clearly visible even under bright daylight. It essentially functions like an Android tablet, allowing easy installation of various apps such as Netflix, Spotify, Google Maps, iOverlander, GAIA GPS, and GasBuddy. While the unit initially supports two camera inputs (reverse and front), additional inputs for features like blind spot monitoring can be easily integrated with a low-cost automatic video input switcher. While I may consider installing a blind spot monitoring system in the future, for now, the factory side mirrors suffice and nearly eliminate any blind spots when changing lanes or merging. Additionally, the front-facing camera proves handy when parking close to walls or posts.
Transitioning from the Eclipse to the Atoto is a breeze, requiring no additional mounting hardware. However, if your Sprinter came with a Becker factory radio, you'll need a "Radio Delete" kit, which can be conveniently sourced through the link below.
List of parts purchased from Amazon:
Optional


 |
 |
 |
 |
 |
Optional
 | This plug was already included in the Eclipse harness, so I just clipped the old wires from the old head unit and spliced in the new Atoto wiring. |
 | ATOTO AC-HD03LR 720P Rearview Backup Camera (180° Wide-Angle), for ATOTO S8 Models only, VSV (Virtual Surround-View) This single camera can generate a virtual surround view on the Atoto screen. |
 | NATIKA Backup/Front View Camera: Starlight Night Vision HD Waterproof 960H CVBS/720P AHD 720P AHD Camera compatible with Atoto Head Unit. |
 | Used for connecting the old backup camera to Atoto head unit as front facing camera. |
 |
 |
 |
 | This kit is required if you own a Becker factory radio. It includes the plastic "Radio Delete" trim as well as the wiring interface for steering wheel controls, 3.5mm AUX Input, USB port, and backup camera function. |
 | Consider these crimpless watertight connectors for faster and easier wire splicing. Using a heat gun, it self-solders the connections. |
YouTube Video of the Upgraded Head Unit:
Step-by-step installation procedures:

Original Eclipse AVN4330 with removable TomTom navigation unit.

The AVN4430 head unit with the rectangular plastic trim removed, revealing the four screws that held the unit in place. Once the screws are removed, the unit easily slides out, and all connecting wires can be unplugged from the unit's rear. The old XM radio and GPS antennas are tucked next to the center dash speaker; to remove the antennas, you must remove the dashboard storage box and the surrounding plastic trim. Click here to learn how to remove the surrounding trims.

After removing the Eclipse head unit and the plastic trims.

The backup camera video cable


There are four screws that hold the dashboard storage box in place, 2 towards the front and another 2 towards the rear of the box (pointed by green arrows)
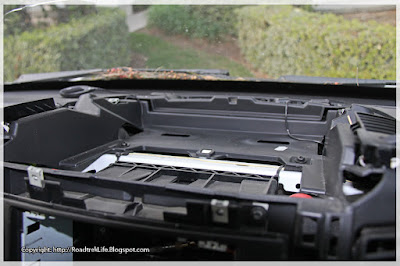
With the front dashboard storage box removed.

Old XM Satellite and GPS antennas.

Wi-Fi Antenna installed in-between the top AC vent and dashboard storage box. For easy installation, the Wi-Fi and GPS antennas came with 3M double-sided adhesive backing.


Rear of the Atoto head unit. The metal cage (painted black) is held in place by four small screws.


Atoto wiring harness needs to be spliced into the Sprinter wiring connector.


Reverse and Parking brake signal wires.

The steering wheel wires (x2) and the steering wheel 3.5-mm jack were not used.

The completed wiring harness.


The top USB socket is for the phone link connection, the lower USB port is for DVR.
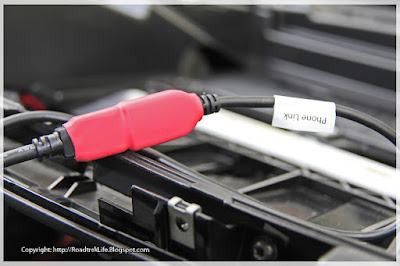
The USB Phone Link and DVR cables were plugged into the panel mount USB extension and heat-shrink wrapped to keep them from coming apart.

Mic installation location. Wiring was routed inside the driver side A-pillar plastic trim then under the dash to the head unit. It is easier to route the wire if you remove the A-pillar trim. Starting from at the top of the pillar trim, grab the trim edges and start pulling it loose in the direction of the radio, the trim should easily come off.

Wiring the new Atoto Android head unit.

Getting there!

Four small screws, 2 on each side secures the new head unit into the metal bracket.


The large 10-inch screen is the ideal size for viewing and reading icons and text from the driver seat. The touch screen is very responsive, and the system boots up quickly.

The iOverlander app. iOverlander is a database of places for overlanders and travelers. It includes camping, hotels, restaurants, mechanics, water, propane filling and may other categories.

Google Map and Navigation. It needs internet connection to display map. I use my cell hotspot or use Android Auto via USB connection.

Netflix app on Google Play Store does not work, you need to install an older Netflix version that is compatible with the head unit. Link> Netflix APK


LED ceiling lights control via app

Front-facing camera feed. When parking close to a wall, post, or shrubs, the camera comes in handy.

NOTE: Any 720p AHD reverse camera will activate the head unit's Virtual Surround View (VSV), which provides a split screen birds-eye-view. My replacement camera, however, has a narrower field of view than the Atoto 180º wide view angle lens designed for VSV, and the panoramic stitching is incorrect. You can disable the VSV via a hidden menu: Navigate to "Settings"> "System" (click System 4 times)> type 3368 (passcode)> uncheck "Simulated Panoramic View." Caution: Do not change any other options in this hidden menu.

Accessing my coach PTZ camera/ DVR. With internet access, the camera can be accessed from any PC or mobile device.
UPDATES:
Firmware update to enable wireless Android Auto (Beta Release): Click here.
Firmware update instruction: Click here.
Note: The links above are hosted and provided by Atoto; it is a beta release version that may or may not work with your Android phone; however, it worked well with my Samsung S22. With the updated firmware, the "Simulated Panoramic View" option is now available from the main menu.

another fantastic writeup.
ReplyDeleteThank you👍
Deletedo you know if this will work with factory reverse camera?
ReplyDeleteYes. I actually reused the original camera as front facing camera. The head unit supports AHD 720p high resolution rear camera, it's the reason I replaced it. The original camera is a low 480 resolution CVBS format, but it works.
Deletefantastic! how is stability of the system? some of these other chinese head unit have had issues with that.
DeleteI've only had it for about two months, but it's been flawless. It boots up quickly, the cameras/radio/Wi-Fi/streaming (audio and video)/Bluetooth/all work, there are no hang ups or freezes, and the touch screen is very responsive. So far, I'm very pleased with it.
DeleteThe only thing that was changed was the radio volume was louder than the other sound sources, it was quick adjustment via a hidden menu.
thanks to this amazing writeup, you've given me the courage to take the leap. I've ordered all the parts. a few questions:
Delete1. i noticed you have two cameras listed. did you install both or just one? I went with the VSV camera.
2. where is the placement you chose for the rear camera, on the license plate?
3. what do you think of the ODB2 addon is it useful?
4. you mentioned that you re-used the original rear camera as a front facing camera? Can you clarify because you have the ATOTO dash camera on your list i assume that would be the forward facing?
Sorry for so many questions.
No, thank you for the questions, I appreciate it.
Delete1. Those are optional lists. The top 5 listing is all you need. The original camera will work with the head unit. Atoto unit supports higher resolution cameras-it is the only reason I replaced it, to get a better and clearer image when backing up.
2. The new rear camera is mounted where the original RT camera was (on top of the 3rd brake light). It was plugged into the same video feed cable to the head unit. The camera power is spliced into the existing power wire from the old camera. I did not bother taking pictures of it as RT's came with different rear camera mounts depending on year models.
3. The OBD addon can be useful for monitoring the engine performance, checking and resetting engine error codes, etc....but, I'm not familiar with the Atoto OBD full functionality. I have a dedicated OBD monitoring system with built-in screen display. It is plugged into same OBD port and displays real time engine data like, turbo boost pressure, engine load/temp, MAF values, ECU voltage, and so much more, I can also monitor if DPF is regenerating, read and resets error codes.
4. The Atoto dashcam is listed as an option, I already have a dedicated dashcam, so I did not purchase that. The old rear camera was re-used as front facing camera, I mounted it on the MB star logo in the front of the grill. The Atoto head unit supports 2 video cameras, one for rear and one front (I can only assume that their dashcam uses the front camera connection).
Pls. don't hesitate to ask me questions, I'm here to help. Thank you.
Great installation details and overall fantastic site. I'm looking at installing a 10" Atoto in an Agile also but struggling with the inevitable gap around the screen because of the curved dash.
ReplyDeleteHow much of a gap do you have in your install?
Thanks.
It is a floating screen design similar to a Model3/Y Tesla. The widest gap is on the sides (due to dash curvature) about 0.69" gap and about 0.25" towards the center. Hope that helps.
DeleteJust wanted to thank you again. The Atoto screen plus the VSV camera are my favorite upgrades I've done thus far. The VSV camera especially has been a game changer , giving me so much more confidence in reversing the vehicle especially into parking spots!
ReplyDeleteYou're welcome. Thanks for your input. Mine has been working good as well, I've updated the firmware and now works wirelessly on Android Auto.
DeleteJust bought a 2012 RoadTrek and taking it for our maiden voyage this weekend! The TomTom was completely dead so I was delighted to find your post on replacing it. Your instructions were spot on and it all worked out perfectly. I thought I'd add some comments that others might find helpful.
ReplyDeleteI had to fish around to find the Sprinter wiring connector. I found it helpful to remove the A/C control panel to gain easier access to all the wiring. I found that the round din connector was for Sirius XM. I bundled up all that wire with a zip tie, labeled it and tucked it in the dash for potential future use. I also removed all the wiring leading to the usb and iPod connector in the glove box.
My orange illumination wire was not connected and had been cut at the connector. I was able to remove the lug and resolder the wire to it but it was loose when I reinserted it. Some hot glue on the back side held it in place nicely and then I could solder it to the Atoto harness.
I had a hard time tucking the mic wire down the A-pillar but then discovered that a gentle pull down and back unpopped it sufficiently to tuck the wire behind it. Also popped out the speaker cover and removed the dash cover to help expose holes to run the wire through. I had enough slack to place the mic in the center above the rearview mirror.
I used the original backup camera for now, but it was hardly functional at all! It was all snow except some faint colors of cars. I tried cleaning the lens but no improvement. Perhaps the lens has gotten cloudy or something. Looks like I'll need to replace the rear camera sooner rather than later. I was hoping to use the old one for the front camera as you described, but it might just be junk.
Thanks for your workup on this! I look forward to implementing some of your other mods.
Thanks for the additional info. Yes, the Sirius XM and USB/iPod cable needs to be removed as it's no longer needed. The A-pillar plastic trim is easy to remove, it pop right off with a gentle tug as you have discovered.
DeleteGreat writeup and supporting links. one question. Can a SXM receiver be used with the ATOT?
ReplyDeleteNo, Atoto does not have connection for SXM. There is an app for SXM that should work, but I've never tried it.
DeleteThanks for such an awesome writeup!
ReplyDeleteFrom the photos, it looks like the only thing that prevents someone from mounting the 'floating' screen recessed back into the dash like the original radio is the Radio Accent Trim (which would need a bigger hole for the 10.1" screen)... Is this true?
You're welcome. Unfortunately, the unit is designed as a floating screen. It's bigger than the hole even without the black accent trim.
Delete